


Make room in your tooth preparation toolbox for a powerful understanding of tooth structure.
 by
by Do you want to reach your desired clinical outcome? When approaching a complex case, we may struggle to maintain confidence in our technique, especially in the crucial stages of tooth preparation. A solid knowledge base can boost your confidence and results.
My recent posts on anterior tooth preparation have focused on critical aspects that make or break a case. The nature of the prep (minimal, aggressive, or in between), common alterations, the quality of your treatment plan, your approach to color change, critical design features, and important considerations are all integral to success. It’s a lot to juggle, but when performed with finesse and precision, it can lead to pristine results.
I’m going to add another ball to the mix of crucial prep considerations you’re juggling: tooth structure.
Tooth Structure: Why It Matters
There are two powerful reasons to make tooth structure top of mind:
- Structural considerations can lead to a higher quality case.
- Understanding ferrule and sound tooth structure creates a lower chance of failure.
The Advantages of Bonding and Ferrule
 The three primary structural considerations include: old restorations, endodontic therapy, and adequate tooth structure to retain the restoration.
Before you move forward with bonding, you need to analyze the quality of the remaining tooth structure, the amount of bonded surface to dentin, and the functional load the patient places on the teeth.
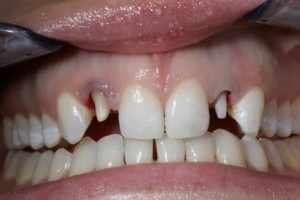
Ferrule is how much natural tooth remains.
Ferrule can be your savior or your downfall while planning for cementation and full coverage. You need adequate ferrule and wall height to create retention form. Minimal tooth structure isn’t optimal, but you can work around it with the proper technique.
Why does failure occur? The answer is simple: repetitive loading. To utilize ferrule properly, you’ll need buccal and lingual walls of natural tooth. Unfortunately, structural longevity in this situation is not dependent on the interproximal.
My advice is to plan for (at a minimum) 1.5mm of ferrule.
Know that the seal will fail when it reaches a certain number of load. Personally, I prefer to place margins on sound tooth structure and don’t like my success to depend on previous restorations. It’s risky to hope that the bond of an old composite or lingering decay won’t compromise your intended outcome.
What do you think is the most important part of tooth preparation? Join the conversation in the comments!
I tend to think of ferrule as something I need with cohesive retained restorations- ideally 4 mm of prep height and at least 2mm of it natural tooth. Buccal and lingual walls are most important for single units, but bridges will benefit from those inter proximal walls.
With bonding, I’m thinking more about maintaining enamel to bond to, and less about ferrule… I want to keep my bonded posterior restorations above the buccal and lingual height of contour if possible and make sure the conditions are ideal for a totally isolated field. When in doubt, the predictability of a full coverage restoration is hard to beat.
Michael,
I couldn’t agree more, and when the amount of ferrule decreases there is support in the literature that bonding the final restoration will increase longevity (or number of cycles before failure) over traditional cementation.