

 There are many impression methods dentists unknowingly use that cause lab confusion and remake headaches. An improper result can necessitate re-doing all of your hard work at the practice and create a longer time before the finished product is ready for the patient. One area we’ve noticed causes a significant amount of problems is ‘pulls and bubbles.’ Utilize the following troubleshooting challenge to improve your relationship with your ceramist.
Pulls and Bubbles – One of the Most Common Impression Problems
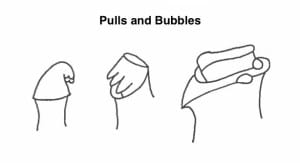
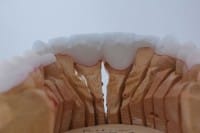
An issue we see very often in the lab that leads to frustrating remakes is the “pulls and bubbles” impression. As you can see in the above graphic, small inaccuracies in the impression can create an unusual discontinuity that may seem inconsequential, but can actually have disastrous effects.
There are many reasons that this can happen. We’ve found two central “problem areas” that seem to plague dentists:
- The impression pulls before it sets.
- There’s a bubble in the impression because the wash wasn’t used appropriately.
There’s no way for the lab tech working with die trim to distinguish where the restoration should end when there are pulls and bubbles. If it’s not one continuous line you’ve got a serious impressioning issue on your hands.
Don’t Settle For An Inaccurate Impression
Sometimes, dentists go through the entire process of creating the impression only to find that they have a ‘pull or bubble’ issue. They may be tempted to settle for a not-quite perfect result and will tell their lab, “do the best you can.”
Our advice at Gold Dust is not to settle. In this case, the lab will have to resort to guessing about the most accurate line. This will inevitably lead to a poor result.
The number one tip we can give you is to examine continuity with a trusted pair of loupes (or any microscope).
If you want to accurately capture topography and avoid the lab having to over-trim the die or fabricate a finished line, make sure the impression material is viscous enough and don’t remove it until it’s fully set.
To really “think like a lab,” check out the first three impression challenges in our troubleshooting series, where you can learn about avoiding inaccurate margins due to preparation design, dealing with cowboy preps that do not translate precisely in the lab, and how the disposable triple tray contributes to unnecessary remakes.