

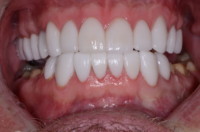
 Creating a color change of more than two shades requires specific design features. Below, I’ll explain how to make them work for you in Part 2 of my series on color change in anterior restorations.
In a previous post, I outlined the basic approach to a color change of less than two shades. In that case, you’re benefitting from predictability and simplicity of process.
Everything changes when the necessary jump in shades increases. To accomplish our goals and leave patients excited about their treatment, we need to alter the preparation accordingly.
Design Features of a Predictable Case: #1
Place the margins subgingivally.
This is important for a variety of reasons and should be implemented during the initial reduction.
The gist of it is this: Once you place the margins subgingivally, you can use the equigingival margin as a guide for where in the sulcus the final margin is placed.
Measure the sulcus depth before tooth preparation. Then place an initial size “0” retraction cord. Ensure that the top of the cord is 1.5 mm from the base of the sulcus.
I would highly recommend this if predictability is the long-term goal for your case. It also helps with protecting tissue and limiting tissue trauma. This should always be front of mind.
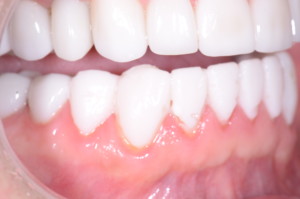
Design Features of a Predictable Case: #2
The interproximal margin line must be placed to the lingual line angle of both contacts.
There are two main upsides to this technique:
- (If using partial coverage) You’ll avoid shadowing of the original tooth color.
- You’ll give the technician control over the visual affect of the porcelain (beyond the height of contour).
If that isn’t enough to convince you, I don’t know what is. You’ll want to minimize any possibility of seeing the underlying darker shade of the teeth. This can be done by gradually increasing the thickness of the porcelain as you near the edge of the prep.
Sometimes, you won’t have much wiggle room. If the patient’s teeth are significantly discolored, a full coverage preparation may be your best option. You’ll need a core that is layered with porcelain.
Predictability is a worthy goal. With these techniques, you can get closer and closer to attaining it.
For more of Dr. Brady’s thoughts on color change, read her post on indirect restorations and ideal veneers.
What parts of an anterior restoration do you find the least and/or the most difficult? Join the conversation in the comments!